The Pledges page allows you to see the pledges created for your organization. You can quickly see the following: when the pledge was created, which campaign their pledge was set up toward, the name of the member, the pledge frequency, the total amount pledged, and date the pledge was last updated.

What do the different Pledge and Fulfillment Statuses mean?
- Active
A pledge that has not reached it's end date and has not been canceled. - Canceled
A pledge that is no longer active. - Completed
A pledge that has reached it's end date. - Fulfilled
When gifts toward the pledge category are equal or greater than the pledged amount. - Unfulfilled
When gifts toward the pledge category are less than the pledged amount. - Promise
A nonactive pledge created by an admin to denote a member's verbal intentions to give towards a campaign. - Canceled Promise
A promise that has been canceled. - Future
A pledge that has a start date that is in the future.
If you hover over the different Pledge and Fulfillment Statuses at the right, a pop-up will display with some additional info about the pledge:
-
Hover over an Active or Completed tag to see the End Date of the pledge.
-
Hover over an Unfulfilled tag to see the Percent Fulfilled.
-
Hover a Fulfilled tag to see the pledge fulfilled date.
-
Hover over a Canceled tag to see when the pledge was canceled.
How To Filter The Pledges List, Change the Sort Order, and Download CSV file
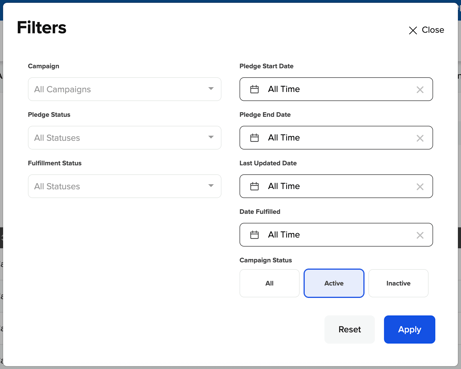
Click the Filters button at the top left of the pledges page to open the Filters window. From there you can filter the pledges by campaign, pledge status, fulfillment status, pledge start and end date, last updated date, date fulfilled, and campaign status. Click the Apply button to save the filter settings.
You can also change the sort order of pledges by clicking on the headers at the top. You can sort pledges by date created, campaign, first name, last name, frequency, total, and last updated date.
By clicking the Download CSV button, a CSV file will generate that includes the info in the screenshot at the top and greatly expanded to include the donor's email and physical address, location, pledge amount, pledge start, pledge end, percent fulfilled, amount fulfilled, and date fulfilled.
How To View The Pledge Details
Click on a donor's pledge to see more information about their pledge. From the Pledge Details page you can see the pledge summary, edit history, and a list transactions given towards their pledge.
-
You can edit the pledge by clicking the edit pencil at the upper right.
-
You can delete the pledge by clicking the trash bin icon at the upper right.
-
If you need to record a cash or check gift towards this member's pledge, then click the Offline Transaction link at the top of the page. That will take you to the the Add Offline Transaction page with the member's information prefilled.
How to enter a pledge on behalf of a donor:
- To create a pledge, start by clicking the plus (+) button at the upper right.
- Then enter the Pledge Type (Pledge or Promise).
- Enter the donor's name or email and choose from the possible matches that appear. If the donor does not have a SecureGive profile, you can create an informational profile for them by the clicking the Add New Member button.
- Choose the name of the campaign.
- Enter a Start and End date.
- Enter the amount of the pledge.
When entering the amount, enter it in relation to the Frequency selected below (weekly, monthly, etc.). Do not enter the total amount to be given during the entire course of the pledge unless you choose the frequency of One Time, and then it would be appropriate to enter the full pledge amount. - Select the frequency that the member will give towards the pledge.
- Finally, click Save to create the pledge.